Hello all,
We are going to look at how we can push out the DataGravity Intelligence Service (DGIS) to virtual machines. This will take care of the install, and updates too. In my lab of 30 or 40 machines it is way too many to do it manual. If I did, I would have to do it on the template, of which I have two or three, and then in each of the existing machines. So lots of work and no time to do it.
Update: while this still works for older versions of the DGIS it does not work with newer since they are an MSI that install various software packages and have questions to be answered. If that is what you want to publish via AD use this article to modify the MSI so it is a zero choice MSI and the process below will work great with it. BTW, the new name is DataGravity Discovery Tools, with Discovery Service (old DGIS) and VSS Provider.
Background Information
Why is there a DGIS that we need to install and update? When a user in a virtual machine writes out to the VM disk, the array Intelligence Engine knows a write occurs so it is in the activity log. However who did the write is not known - there is no way for the array to know who inside the VM did the write. So the DGIS - a very lightweight - low footprint - agent is installed and that will make sure the Intelligence Engine knows who did what write inside the VM.
We are going to use Active Directory and Group Policy to assign to the virtual machines on the DG array the DGIS software. When new VMs are added they will automatically get the software and when there is upgrades available to we can easily assign it to them.
Note: you can install the DGIS software in your templates with no issue. That will get the DGIS in any new computers but the process here will help you get it on the existing computers. Plus with updated versions of DGIS you can use this process to update all of your virtual machines.
So lets get started!
Prerequisites
We will need to have ready for this work the following items:
- The MSI of the DGIS software. You can find it in the Customer portal (customer or partner credentials required) if you do not have it currently. If you take the DataGravity Discovery Tools remember that the MSI will install by default several pieces of software and this article will fix that.
- Administrative access in the AD - to create GPO and to log in as an admin user to test the install.
- You need access to the tools Group Policy Management Console and AD Users & Computers. Don’t work on your DC, but rather use the Admin tools installed to your admin desktop. If you need the tools you can find them here. Once installed you will have the tools you need under the Administration Tools folder on the Start menu.
- I also like to have better status messages (on the VM console via VMRC for example) and you can enable those in Computer Configuration > Polices > Administrative Templates > System and enable Display highly detailed Status Messages. I would do this in the same GPO object I am pushing software out from. In Windows 7 it is Verbose vs. normal status messages in same location. Enable to get verbose. This is the same as Display highly but Display is Win2K12 and verbose is Win7.
Preparation
There are a number of things to prepare before we can continue.
Active Directory OU
We need to have an OU or sub OU for the virtual machines. We only want to have this software published to virtual machines - while it would not hurt physical machines it would be a waste of resources. So if you don’t have one yet, you should now create one. Mine looks like this (DG Computers \ Virtual Machines):
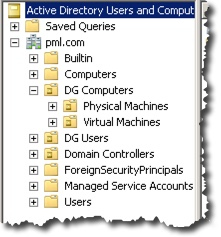
My lab OU for virtual machines
So we have a place to anchor our GPO object to, so that is good.
Software Distribution Point
Now we need to create a location to keep the MSI file. I suggest you do not use a CIFS share for that if possible. This is the path to mine. I had problems - as I mention below with my CIFS share. You should use a Windows share as a distribution point.
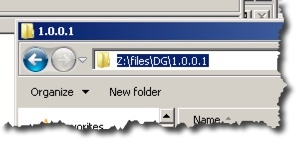
The correct but wrong path format!
While the path above is correct it is not what we can use. If we do not click on the URL we see what is mostly correct.
What we see here is almost the proper path for me to use later in the GPO configuration. But below is exactly what is right.
\\bossyn01.pml.com\Library\files\DG\1.0.1
We need to make sure the permissions on that folder lets all of the computers on your network access it. That means Domain Computers needs read access. I say Domain Computers since it includes computers - in the past it might have been Authenticated Users.
Group Policy object
We now create a Group Policy object that will be what represents our application. So do the follow steps in the Group Policy Management Console.
- Click on, and select the OU that holds your virtual machines - and <right+click>. You should see something like below.
- The first option of Create a new GPO and link it here is the option we need.
- Once selected you get an option to name the GPO. I give it a name and version as seen below.
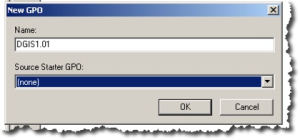
Naming a new GPO object
- Once you hit OK we now have a new GPO object and it is seen to be connected to the right place. See below for an example.
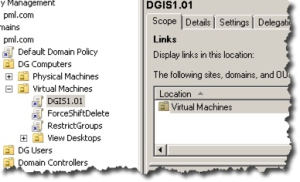
New GPO ready for editing!
- Now we have an empty GPO object and we can <right + click> on it. Before we Edit it, we should disable the Link so that it will not impact machines or users before we are finished. Often people will create the GPO in the GPO Objects view for this reason and only link them after they are ready. See below for where you can disable the Link and also go into Edit mode.
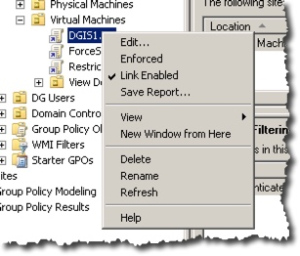
Right Click menu on a GPO object
- Once you disable the Link <right+click> again and select Edit. You will see the following screen.
- We can now start configuring our GPO object.
- We are going to distribute our software to computers rather then people so we expand Computer Configuration \ Policies \ Software Settings. This can be seen below.
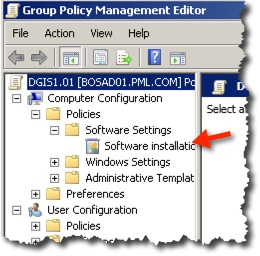
Computer Software Installation Policies
- We <right+click> on Software installation as seen above and select New followed by Package.
- We are now prompted for the file and path to the file we wish to publish.
- With the proper MSI selected, we use the Open button.
- When prompted for Assign, or Advance, select Assign. We are assigning this software to the computer after all and not users.
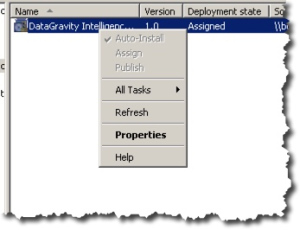
- We will see - after a very brief moment, and maybe a click on Software Installation, something like below.
- You can <right+click> on the package and select Properties to see much more about the package.
- Generally the defaults work. Normally I would make no changes to them at this time.
So we are ready to test now!
Testing (and troubleshooting)
We should pick a VM that doesn’t have this software, and use it for our test.
- Make sure you have enabled Link if you disable it above.
- We could just let the virtual machine reboot (likely twice) and this package would be installed. However, I like to be more careful and watch the first few times.
- We will use the command below to force things along.
gpupdate /force
- You will be prompted to restart.
- Since the gpupdate command brought the policy down to the computer we do not need to reboot to do that. So that saves us a reboot. Some policy requires a reboot and some don’t. But the change we are doing does so we are prompted to restart.
- If you can watch the console and you are quick you might see this message:
- Very cool. Depending on the size of the package, and how many packages, will determine how much time at start your login will be delayed.
- I was distracted by a phone call and when I looked back I could log in.
- When I logged in I found that there was no DataGravity folder in Program Files, nor anything in the Add Remove programs.
- I did confirm though the policy was applied. I used the following command at the command prompt on the VM to check.
gpresult /r
- I had to scroll through the results but I found the info as seen below.
- So it was applied but I see no evidence it was! So I need to investigate.
- I look to the Event Logs - System. I look for Application Management to try and get some clues.
- We can see assignment was successful.
- We get a clue in the Error installing. The error was %%1612.
- Google has a lot on this but nothing specific, and the range of things covers off Win2K, and XP, and Office. And I am using Win2K12. But there is a theme that suggests it is permissions related.
- So while I did apply the permissions I mentioned about to the folder where my files are, I now applied it to the root level.
- I gpupdate /force and reboot. Still no improvement.
- I was not successful while I used the Synology as my CIFS share. Not sure why. But when I used a share from a Windows server this all worked fine. I knew it worked fine because of the DataGravity folder in the C:\Program Files. Turns out that the reason for this issue is due to Samba not being able to handle machine accounts which is used for authentication in this software distribution technique and they do not work with Samba by default.
Miscellaneous Info
Propagating the app!
There is a time cycle that GPO works on and so the new policy will be brought down to the machine after a bit - 90 minutes with offset of 0 to 30 minutes. Once the policy is down, the next reboot the install will occur, and likely there will be one or two reboots as part of the install. But generally speaking I would say that overnight the policy will be done everywhere and the next reboot - such as with patching or VMware Tools update will have the app install. Of course, if you need to you can force things along as we did above.
The DataGravity Discovery Service, also called DataGravity Intelligence Service, is seen in the task manager as dgagent.exe.
How many times has this package been installed?
If you would like to know how many VMs have this software you can find that out. You should use the following steps.
- In GPMC access the GPO that does the software install.
- Now Expand Computer Configuration, Policies, Software Settings.
- Edit your software package,
- and change to the Deployment tab
- Use the Advanced button, and you will see a Deployment Count.
Note that the count doesn’t seem to update very fast. Actually the number never seems to update. Not sure why.
Remove the application
If you wish to remove(or re-install) the software package you can do that. Start in the GPMC and in the Computer Policies area.
- You need to <right+click> on the package you wish to remove.
- Select All Tasks, followed by Remove.
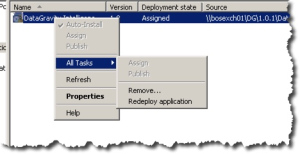
About to remove application
- Once you select remove you will see the next menu.
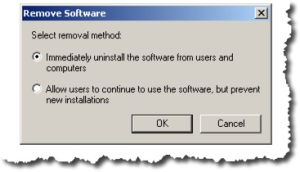
- Be aware that you can remove the application or leave the application and not let any new installs occurs.
- Once you make up your choice select OK and you are done.
- I used the Immediately option and it deleted the Software Package.
- Be aware that Immediately doesn’t mean actually right this moment. Seems to need a reboot or time or both.
- Do not delete the GPO object as that will mean if a computer is offline and comes back will not know to uninstall.
Last Words
So you now know how to push the DGIS install out to your virtual machines, and that also means you know how to push out updates too. This process will of course work for other MSI software too as well as update it too!
As always, comments or questions are always welcome.
Updates
- 12/1/15 - this article, while it works for other simple software, and for the older version of the DataGravity Discovery Tools it is not good for the newer version. To help with that check out this article. I have made sure that if you follow that article to change your MSI you can deliver the MSI with this article.
- 7/8/15 - added that DataGravity Discovery Service is seen as dgagent.exe in the task manager.
- 7/2/15 - fixed some spelling, and made some graphics bigger to more easily view them.
Michael
=== END ===

I assume we can share this link with customers. Seems like a silly question , but I had to ask ;->
Michael Long
Technical Support Engineer
DataGravity Inc.
100 Innovative Way, Suite 3410, Nashua NH 03062
The on-call engineer can always be reached by calling 1-844-DGHELP-1 (1-844-344-3571)
Yes, please feel free to share!
Michael
Awesome article Mike - Using this today on an install!
Cool, let me know how it goes.
Michael